100% Pass Nutanix - Useful Reliable NCM-MCI-6.10 Exam Price
Wiki Article
What's more, part of that ValidTorrent NCM-MCI-6.10 dumps now are free: https://drive.google.com/open?id=1SnvBnCsNxY6BzrA6Oqct0k_dfvjrWUah
ValidTorrent offers you a full refund if you are not able to pass the NCM-MCI-6.10 certification exams after preparing with our products. The high quality of NCM-MCI-6.10 certification exam preparation products increases your success probability and reduces the chances of failure. The NCM-MCI-6.10 exam preparation products contain all the features to make you ready for embracing success in a first attempt. These NCM-MCI-6.10 Exam Preparation products are updated regularly for guaranteed success. Free demo is also offered to the users for checking the NCM-MCI-6.10 exam preparation products quality.
Different from other similar education platforms, the NCM-MCI-6.10 quiz guide will allocate materials for multi-plate distribution, rather than random accumulation without classification. How users improve their learning efficiency is greatly influenced by the scientific and rational design and layout of the learning platform. The Nutanix Certified Master - Multicloud Infrastructure (NCM-MCI) prepare torrent is absorbed in the advantages of the traditional learning platform and realize their shortcomings, so as to develop the NCM-MCI-6.10 test material more suitable for users of various cultural levels. If just only one or two plates, the user will inevitably be tired in the process of learning on the memory and visual fatigue, and the NCM-MCI-6.10 test material provided many study parts of the plates is good enough to arouse the enthusiasm of the user, allow the user to keep attention of highly concentrated.
>> Reliable NCM-MCI-6.10 Exam Price <<
NCM-MCI-6.10 Certification Training | NCM-MCI-6.10 Exam Dumps Collection
We will have a dedicated specialist to check if our NCM-MCI-6.10 learning materials are updated daily. We can guarantee that our NCM-MCI-6.10 exam question will keep up with the changes, and we will do our best to help our customers obtain the latest information. If you choose to purchase our NCM-MCI-6.10 quiz torrent, you will have the right to get the update for free. Once our NCM-MCI-6.10 Learning Materials are updated, we will automatically send you the latest information about our NCM-MCI-6.10 exam question. We assure you that our company will provide customers with a sustainable update system.
Nutanix Certified Master - Multicloud Infrastructure (NCM-MCI) Sample Questions (Q18-Q23):
NEW QUESTION # 18
Task 3
An administrator needs to create a report named VMs_Power_State that lists the VMs in the cluster and their basic details including the power state for the last month.
No other entities should be included in the report.
The report should run monthly and should send an email to [email protected] when it runs.
Generate an instance of the report named VMs_Power_State as a CSV and save the zip file as DesktopFilesVMs_Power_state.zip Note: Make sure the report and zip file are named correctly. The SMTP server will not be configured.
Answer:
Explanation:
See the Explanation for step by step solution.
Explanation:
To create a report named VMs_Power_State that lists the VMs in the cluster and their basic details including the power state for the last month, you can follow these steps:
Log in to Prism Central and click on Entities on the left menu.
Select Virtual Machines from the drop-down menu and click on Create Report.
Enter VMs_Power_State as the report name and a description if required. Click Next.
Under the Custom Views section, select Data Table. Click Next.
Under the Entity Type option, select VM. Click Next.
Under the Custom Columns option, add the following variables: Name, Cluster Name, vCPUs, Memory, Power State. Click Next.
Under the Time Period option, select Last Month. Click Next.
Under the Report Settings option, select Monthly from the Schedule drop-down menu. Enter [email protected] as the Email Recipient. Select CSV as the Report Output Format. Click Next.
Review the report details and click Finish.
To generate an instance of the report named VMs_Power_State as a CSV and save the zip file as DesktopFilesVMs_Power_state.zip, you can follow these steps:
Log in to Prism Central and click on Operations on the left menu.
Select Reports from the drop-down menu and find the VMs_Power_State report from the list. Click on Run Now.
Wait for the report to be generated and click on Download Report. Save the file as DesktopFilesVMs_Power_state.zip.
1.Open the Report section on Prism Central (Operations > Reports)
2.Click on the New Report button to start the creation of your custom report
3.Under the Custom Views section, select Data Table
4.Provide a title to your custom report, as well as a description if required.
5.Under the Entity Type option, select VM
6.This report can include all as well as a selection of the VMs
7.Click on the Custom Columns option and add the below variables:
a.Name - Name of the listed Virtual Machine
b.vCPUs - A combination of the vCores and vCPU's assigned to the Virtual Machine c.Memory - Amount of memory assigned to the Virtual Machine d.Disk Capacity - The total amount of assigned virtual disk capacity e.Disk Usage - The total used virtual disk capacity f.Snapshot Usage - The total amount of capacity used by snapshots (Excluding Protection Domain snapshots)
8.Under the Aggregation option for Memory and Disk Usage accept the default Average option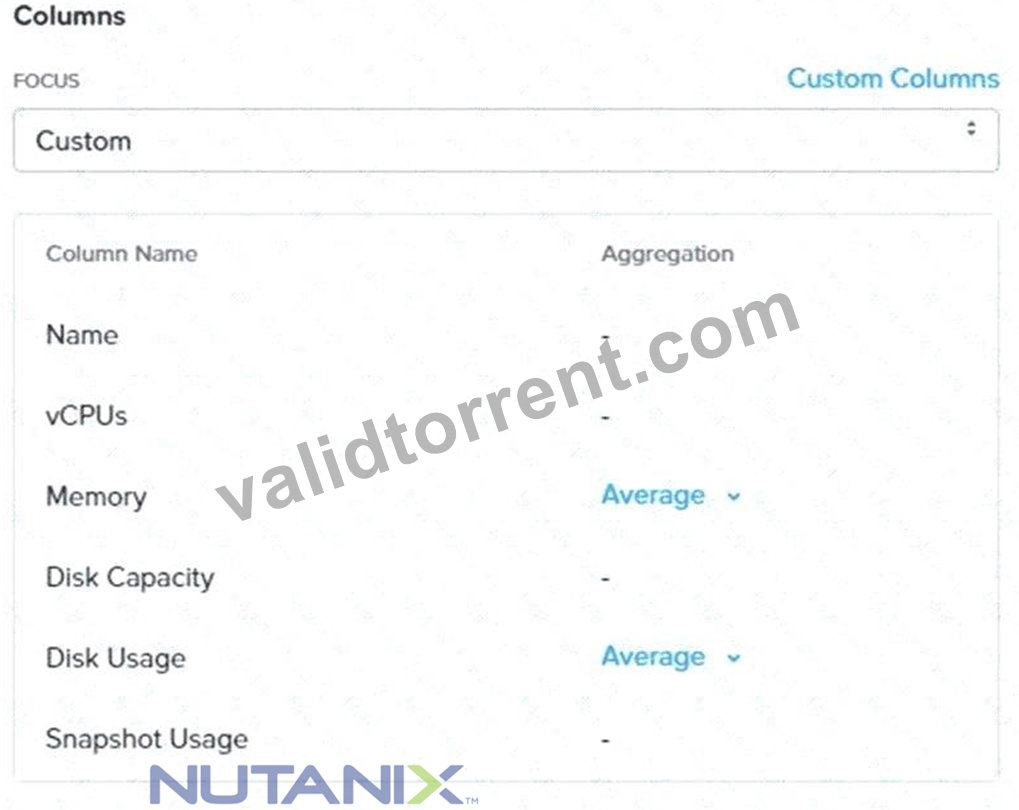
9.Click on the Add button to add this custom selection to your report
10.Next click on the Save and Run Now button on the bottom right of the screen
11.Provide the relevant details on this screen for your custom report:
12.You can leave the Time Period For Report variable at the default of Last 24 Hours
13.Specify a report output of preference (PDF or CSV) and if required Additional Recipients for this report to be mailed to. The report can also simply be downloaded after this creation and initial run if required
14.Below is an example of this report in a CSV format:
NEW QUESTION # 19
TASK 1
A newly created Windows VM "SQL02" is experiencing poor storage performance when compared to
"SQL01" running within the same cluster, on the same storage container.
The cluster is in a healthy state.
Create a new session named Monitor SQL02 with meaningful metrics. Right click on the session page and click Select All then paste this into Notepad and save it as Task 1.txt on the desktop.
Also, save the analysis as a report named MonitorSQL02 and send the report as a PDF on a daily basis to [email protected]. Reports should not be retained. If any new objects need to be created, use monitovm2 in the name.
Finally, correct the issue within "SQL02".
Notes:
* Do not power on the VMs.
* While you will be creating a session, you will need to examine the VM configurations to determine the issue.
* Do not delete the VM to resolve the issue, any other destructive change is acceptable.
Answer:
Explanation:
See the Explanation below for detailed answer.
Explanation:
Here is the step-by-step solution to all three tasks, performed within the Nutanix Prism interface.
Task 1: Create Monitoring Session & Save Metrics
* From the Prism Central dashboard, navigate to Operations > Analysis.
* Click the + New Session button.
* Name the session Monitor SQL02.
* In the "Entities" search box, type SQL01 and select VM: SQL01.
* In the "Entities" search box, type SQL02 and select VM: SQL02.
* Click Add Charts > New Chart.
* Title: Storage IOPS
* Metric: Storage Controller IOPS
* Click Add.
* Click Add Charts > New Chart.
* Title: Storage Latency
* Metric: Storage Controller Latency
* Click Add.
* Click Add Charts > New Chart.
* Title: Storage Bandwidth
* Metric: Storage Controller Bandwidth
* Click Add.
* Click Save Session.
* With the "Monitor SQL02" session open, right-click anywhere on the page and click Select All.
* Right-click again and select Copy.
* Open Notepad, paste the content, and save the file to the desktop as Task 1.txt.
(The content pasted into Task 1.txt would be the session's chart configurations, showing metrics for SQL01 and SQL02.)
Task 2: Create and Schedule the Report
* While still in the "Monitor SQL02" analysis session, click the Save as Report button (it looks like a bookmark icon).
* Name the report MonitorSQL02 and click Save.
* Navigate to Operations > Reports.
* Find the MonitorSQL02 report in the list. Select its checkbox.
* Click the Actions dropdown and select Schedule.
* Configure the schedule with the following settings:
* Schedule Name: monitovm2_daily_report
* Recurrence: Daily
* Start Time: (Set to a time, e.g., 8:00 AM)
* Repeat every: 1 day(s)
* Retention Policy: Uncheck the "Retain a copy of the report" box. (This ensures reports are not retained).
* Email Report: Check this box.
* Format: PDF
* Recipients: [email protected]
* Click Save.
Task 3: Identify and Correct the Performance Issue
This task is performed without powering on the VMs, indicating a configuration error.
Investigation
* Navigate to VMs > Table view.
* Click on the SQL01 (the good VM) and select the Configuration tab.
* Expand the Disks section. Observe that the primary disk is attached to a SCSI bus (e.g., scsi.0). This is the high-performance standard.
* Return to the VM list and click on SQL02 (the problem VM).
* Expand the Disks section.
Root Cause
You discover that the primary disk for SQL02 is attached to an IDE bus. The IDE bus has significant performance limitations and is not suitable for a database server, causing the poor storage performance.
Correction
* With the SQL02 VM selected, click the Update button.
* In the "Update VM" dialog, scroll down to the Disks section.
* Find the disk attached to the IDE bus. Click the Edit (pencil) icon for that disk.
* Change the Bus Type dropdown from IDE to SCSI.
* The Device Index will automatically populate (e.g., scsi.0).
* Click Save in the "Update Disk" dialog.
* (Note: A "VirtIO SCSI Controller" will be automatically added to the VM configuration if one was not already present.)
* Click Save in the "Update VM" dialog.
The VM SQL02 is now configured to use the high-performance VirtIO-SCSI controller, which will resolve the storage performance discrepancy once the VM is powered on.
NEW QUESTION # 20
Task 1
An administrator needs to configure storage for a Citrix-based Virtual Desktop infrastructure.
Two VDI pools will be created
Non-persistent pool names MCS_Pool for tasks users using MCS Microsoft Windows 10 virtual Delivery Agents (VDAs) Persistent pool named Persist_Pool with full-clone Microsoft Windows 10 VDAs for power users
20 GiB capacity must be guaranteed at the storage container level for all power user VDAs The power user container should not be able to use more than 100 GiB Storage capacity should be optimized for each desktop pool.
Configure the storage to meet these requirements. Any new object created should include the name of the pool (s) (MCS and/or Persist) that will use the object.
Do not include the pool name if the object will not be used by that pool.
Any additional licenses required by the solution will be added later.
Answer:
Explanation:
See the Explanation for step by step solution.
Explanation:
To configure the storage for the Citrix-based VDI, you can follow these steps:
Log in to Prism Central using the credentials provided.
Go to Storage > Storage Pools and click on Create Storage Pool.
Enter a name for the new storage pool, such as VDI_Storage_Pool, and select the disks to include in the pool.
You can choose any combination of SSDs and HDDs, but for optimal performance, you may prefer to use more SSDs than HDDs.
Click Save to create the storage pool.
Go to Storage > Containers and click on Create Container.
Enter a name for the new container for the non-persistent pool, such as MCS_Pool_Container, and select the storage pool that you just created, VDI_Storage_Pool, as the source.
Under Advanced Settings, enable Deduplication and Compression to reduce the storage footprint of the non- persistent desktops. You can also enable Erasure Coding if you have enough nodes in your cluster and want to save more space. These settings will help you optimize the storage capacity for the non-persistent pool.
Click Save to create the container.
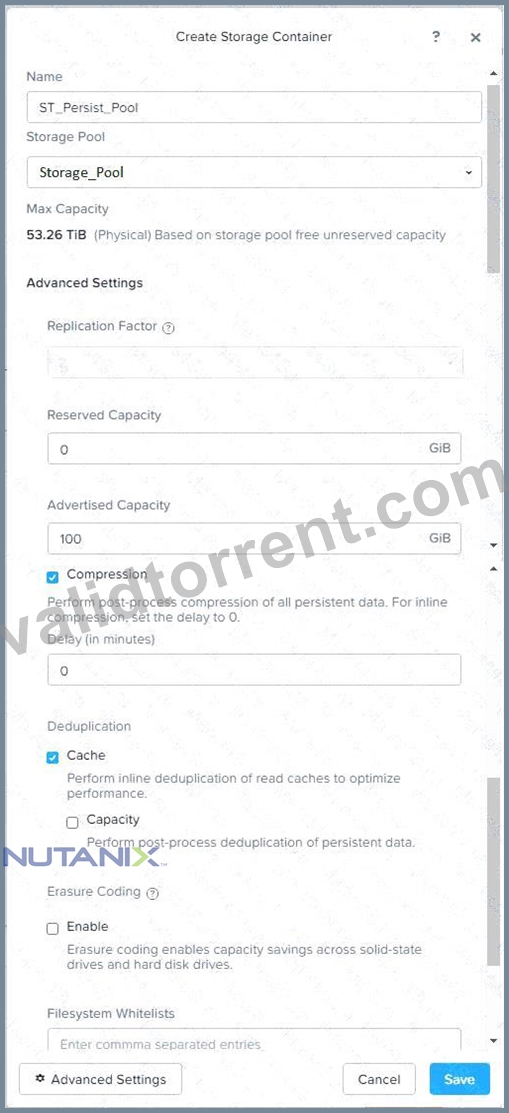
Go to Storage > Containers and click on Create Container again.
Enter a name for the new container for the persistent pool, such as Persist_Pool_Container, and select the same storage pool, VDI_Storage_Pool, as the source.
Under Advanced Settings, enable Capacity Reservation and enter 20 GiB as the reserved capacity. This will guarantee that 20 GiB of space is always available for the persistent desktops. You can also enter 100 GiB as the advertised capacity to limit the maximum space that this container can use. These settings will help you control the storage allocation for the persistent pool.
Click Save to create the container.
Go to Storage > Datastores and click on Create Datastore.
Enter a name for the new datastore for the non-persistent pool, such as MCS_Pool_Datastore, and select NFS as the datastore type. Select the container that you just created, MCS_Pool_Container, as the source.
Click Save to create the datastore.
Go to Storage > Datastores and click on Create Datastore again.
Enter a name for the new datastore for the persistent pool, such as Persist_Pool_Datastore, and select NFS as the datastore type. Select the container that you just created, Persist_Pool_Container, as the source.
Click Save to create the datastore.
The datastores will be automatically mounted on all nodes in the cluster. You can verify this by going to Storage > Datastores and clicking on each datastore. You should see all nodes listed under Hosts.
You can now use Citrix Studio to create your VDI pools using MCS or full clones on these datastores. For more information on how to use Citrix Studio with Nutanix Acropolis, see Citrix Virtual Apps and Desktops on Nutanix or Nutanix virtualization environments.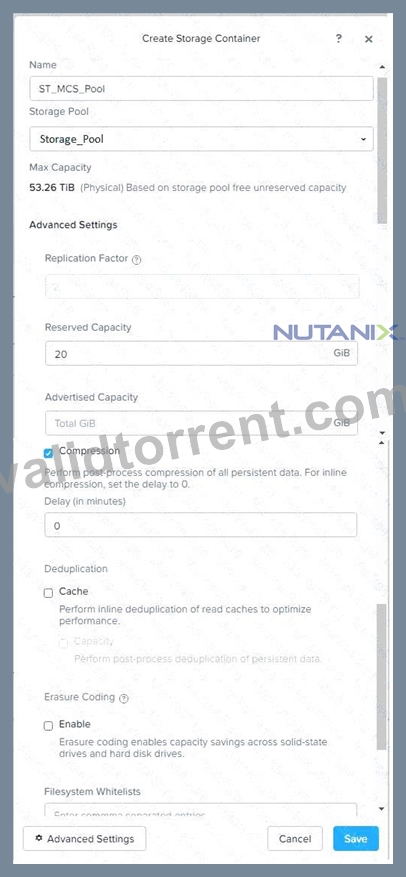
https://portal.nutanix.com/page/documents/solutions/details?targetId=BP-2079-Citrix-Virtual-Apps-and- Desktops:bp-nutanix-storage-configuration.html
NEW QUESTION # 21
The Database team is reporting performance degradation for a business-critical application on Saturdays.
The team is requesting monitoring of processor, memory and storage utilization for the cluster for the application: SQL01, SQL02.
The report should contain views for the following:
* At the cluster level, only for the Cluster 1: The maximum percentage of CPU used
* At the VM level, including any future VM with the prefix SQL: The maximum time taken, maximum percentage of time a VM waits to use the physical CPU, out of the total CPU The report should run on Sundays at 12:00 AM for the previous 7 days. The report should show when completed.
Create a report named SQL_Batch_Saturday that meets these requirements.
Generate an instance of the report named SQL_Batch_Saturday as a CSV and save the file.
Note: You must name the report SQL_Batch_Saturday to receive any credit. Any other name will not be accepted. SMTP is not configured.
Answer:
Explanation:
See the Explanation below for detailed answer.
Explanation:
Here is the step-by-step solution to create and run the report, performed entirely within Prism Central.
1. Create the Analysis Session
First, we will build the charts and entities for the report using the Analysis tool.
* From the Prism Central main menu, navigate to Operations > Analysis.
* Click the + New Session button.
* Add the required entities:
* In the "Entities" search box, type Cluster 1 and select Cluster: Cluster 1.
* In the "Entities" search box, type SQL01 and select VM: SQL01.
* In the "Entities" search box, type SQL02 and select VM: SQL02.
* Click Add Charts > New Chart to add the Cluster CPU chart:
* Title: Cluster 1 Max CPU Usage
* Entity Type: Cluster
* Metric: Cluster CPU Usage %
* Aggregation: Select Maximum.
* Click Add.
* Click Add Charts > New Chart to add the VM CPU Ready Time chart:
* Title: VM Max CPU Ready Time
* Entity Type: VM
* Metric: CPU Ready Time %
* Aggregation: Select Maximum.
* Click Add.
2. Save and Configure the Report
Now, save the session as a report and configure it to dynamically include all VMs with the SQL prefix.
* Click the Save as Report icon (the bookmark icon in the upper right).
* Name the report SQL_Batch_Saturday and click Save.
* Navigate to Operations > Reports.
* Find the SQL_Batch_Saturday report you just created and click its name to open the report editor.
* In the Entities tile, click the Edit (pencil) icon.
* By default, it will list "Cluster 1", "SQL01", and "SQL02".
* Change the VM selection:
* Select the radio button for All VMs prefixed with.
* In the text box, enter SQL.
* Ensure "Cluster 1" is still listed under "Clusters".
* Click Save.
3. Schedule the Report
* While still in the report editor for SQL_Batch_Saturday, click the Schedule button.
* Configure the schedule:
* Recurrence: Weekly
* Repeat on: Sunday
* Start Time: 12:00 AM
* Time Range: Previous 7 Days
* Configure the notification (as SMTP is not available):
* Expand the Notification Settings section.
* Check the box for Notify when ready (this enables the bell icon notification).
* Ensure "Email Report" is not checked.
* Click Save.
4. Generate and Save the CSV Instance
Finally, run the report now and download the CSV as requested.
* Navigate back to the main Operations > Reports list.
* Select the checkbox next to SQL_Batch_Saturday.
* Click the Actions dropdown and select Run Now.
* In the dialog, confirm the time range (e.g., "Last 7 Days") and click Run.
* Click the Report Instances tab.
* Wait for the report instance "SQL_Batch_Saturday" to finish running (the status will change from
"Running" to Succeeded).
* Once it has succeeded, click the Download (arrow) icon for that instance.
* Select the CSV format.
* Save the file to the desktop.
NEW QUESTION # 22
Task 14
An administrator has been asked to configure a storage for a distributed application which uses large data sets across multiple worker VMs.
The worker VMs must run on every node. Data resilience is provided at the application level and low cost per GB is a Key Requirement.
Configure the storage on the cluster to meet these requirements. Any new object created should include the phrase Distributed_App in the name.
Answer:
Explanation:
See the Explanation for step by step solution.
Explanation:
To configure the storage on the cluster for the distributed application, you can follow these steps:
Log in to Prism Element of cluster A using the credentials provided.
Go to Storage > Storage Pools and click on Create Storage Pool.
Enter a name for the new storage pool, such as Distributed_App_Storage_Pool, and select the disks to include in the pool. You can choose any combination of SSDs and HDDs, but for low cost per GB, you may prefer to use more HDDs than SSDs.
Click Save to create the storage pool.
Go to Storage > Containers and click on Create Container.
Enter a name for the new container, such as Distributed_App_Container, and select the storage pool that you just created, Distributed_App_Storage_Pool, as the source.
Under Advanced Settings, enable Erasure Coding and Compression to reduce the storage footprint of the data.
You can also disable Replication Factor since data resilience is provided at the application level. These settings will help you achieve low cost per GB for the container.
Click Save to create the container.
Go to Storage > Datastores and click on Create Datastore.
Enter a name for the new datastore, such as Distributed_App_Datastore, and select NFS as the datastore type.
Select the container that you just created, Distributed_App_Container, as the source.
Click Save to create the datastore.
The datastore will be automatically mounted on all nodes in the cluster. You can verify this by going to Storage > Datastores and clicking on Distributed_App_Datastore. You should see all nodes listed under Hosts.
You can now create or migrate your worker VMs to this datastore and run them on any node in the cluster.
The datastore will provide low cost per GB and high performance for your distributed application.
NEW QUESTION # 23
......
The best way for candidates to know our Nutanix NCM-MCI-6.10 training dumps is downloading our free demo. We provide free PDF demo for each exam. This free demo is a small part of the official complete Nutanix Certified Master - Multicloud Infrastructure (NCM-MCI) NCM-MCI-6.10 training dumps. The free demo can show you the quality of our exam materials. You can download any time before purchasing.
NCM-MCI-6.10 Certification Training: https://www.validtorrent.com/NCM-MCI-6.10-valid-exam-torrent.html
Nutanix Reliable NCM-MCI-6.10 Exam Price What you need to do is to prepare for the exam and not concern with anything else, If you are worried the changing exam content, no problem, our NCM-MCI-6.10 exam torrent will offer you the latest exam materials, Our NCM-MCI-6.10 learning materials not only provide you with information, but also for you to develop the most suitable for your learning schedule, this is tailor-made for you, according to the timetable to study and review, Our NCM-MCI-6.10 exam dumps will lead you to success!
Establish a Schedule, Moving from one application to another NCM-MCI-6.10 generally doesn't start a new task, What you need to do is to prepare for the exam and not concern with anything else.
If you are worried the changing exam content, no problem, our NCM-MCI-6.10 Exam Torrent will offer you the latest exam materials, Our NCM-MCI-6.10 learning materials not only provide you with information, but also for you to develop the most Reliable NCM-MCI-6.10 Exam Price suitable for your learning schedule, this is tailor-made for you, according to the timetable to study and review.
Nutanix Certified Master - Multicloud Infrastructure (NCM-MCI) Valid Exam Format & NCM-MCI-6.10 Latest Practice Questions & Nutanix Certified Master - Multicloud Infrastructure (NCM-MCI) Free Updated Training
Our NCM-MCI-6.10 exam dumps will lead you to success, Our real NCM-MCI-6.10 exam questions in three formats are designed to save time and help you clear the NCM-MCI-6.10 certification exam in a short time.
- Reliable NCM-MCI-6.10 copyright Files ???? NCM-MCI-6.10 Passed ???? NCM-MCI-6.10 New Test Materials ???? Open website ( www.prepawaypdf.com ) and search for ( NCM-MCI-6.10 ) for free download ????NCM-MCI-6.10 Valid Test Fee
- NCM-MCI-6.10 Passed ???? NCM-MCI-6.10 Valid Real Test ???? Free NCM-MCI-6.10 Download ???? Search for ⏩ NCM-MCI-6.10 ⏪ and download it for free on ▶ www.pdfvce.com ◀ website ????Valid NCM-MCI-6.10 Test Duration
- Pass Guaranteed Nutanix - The Best NCM-MCI-6.10 - Reliable Nutanix Certified Master - Multicloud Infrastructure (NCM-MCI) Exam Price ???? Download 【 NCM-MCI-6.10 】 for free by simply searching on ▛ www.verifieddumps.com ▟ ????NCM-MCI-6.10 Exam Materials
- Pass Guaranteed Quiz 2026 Nutanix NCM-MCI-6.10: Nutanix Certified Master - Multicloud Infrastructure (NCM-MCI) Updated Reliable Exam Price ???? Search for ▛ NCM-MCI-6.10 ▟ and easily obtain a free download on ⮆ www.pdfvce.com ⮄ ✅NCM-MCI-6.10 Valid Exam Cram
- Accurate Reliable NCM-MCI-6.10 Exam Price | 100% Free NCM-MCI-6.10 Certification Training ???? Simply search for [ NCM-MCI-6.10 ] for free download on 【 www.troytecdumps.com 】 ????NCM-MCI-6.10 Passed
- Pass NCM-MCI-6.10 Exam with Trustable Reliable NCM-MCI-6.10 Exam Price by Pdfvce ???? Immediately open ➥ www.pdfvce.com ???? and search for ✔ NCM-MCI-6.10 ️✔️ to obtain a free download ????NCM-MCI-6.10 Latest Test Online
- Accurate Reliable NCM-MCI-6.10 Exam Price | 100% Free NCM-MCI-6.10 Certification Training ???? Immediately open ▛ www.exam4labs.com ▟ and search for ➥ NCM-MCI-6.10 ???? to obtain a free download ????Actual NCM-MCI-6.10 Test
- Testking NCM-MCI-6.10 Learning Materials ???? Test NCM-MCI-6.10 Pass4sure ???? NCM-MCI-6.10 Valid copyright ???? Search for “ NCM-MCI-6.10 ” and download exam materials for free through 《 www.pdfvce.com 》 ????NCM-MCI-6.10 Latest Test Online
- NCM-MCI-6.10 Valid Test Fee ???? Actual NCM-MCI-6.10 Test ⏪ NCM-MCI-6.10 Valid Test Fee ???? Open ✔ www.practicevce.com ️✔️ enter ▷ NCM-MCI-6.10 ◁ and obtain a free download ????Valid NCM-MCI-6.10 Test Duration
- Accurate Reliable NCM-MCI-6.10 Exam Price | 100% Free NCM-MCI-6.10 Certification Training ???? Immediately open 「 www.pdfvce.com 」 and search for “ NCM-MCI-6.10 ” to obtain a free download ????NCM-MCI-6.10 New Test Materials
- NCM-MCI-6.10 Valid copyright ↙ NCM-MCI-6.10 Valid copyright ◀ Test NCM-MCI-6.10 Online ???? Easily obtain ⏩ NCM-MCI-6.10 ⏪ for free download through ☀ www.pdfdumps.com ️☀️ ????NCM-MCI-6.10 Valid Test Fee
- jemimahjuu040787.wiki-jp.com, hannavocf031836.blogsvirals.com, gerardvrlv161771.blogproducer.com, www.stes.tyc.edu.tw, janadqyi990430.ttblogs.com, myahqhk487226.bloggactivo.com, www.stes.tyc.edu.tw, deannaowfv826825.blognody.com, leanptx803643.wikinstructions.com, jakubgquz785966.mappywiki.com, Disposable vapes
2026 Latest ValidTorrent NCM-MCI-6.10 copyright and NCM-MCI-6.10 copyright Free Share: https://drive.google.com/open?id=1SnvBnCsNxY6BzrA6Oqct0k_dfvjrWUah
Report this wiki page